Understanding Aloe Plants
What are Aloe Plants?
Aloe plants, part of the succulent family, are renowned for their ability to store water in their fleshy leaves. With over 500 species, the most common being Aloe vera, these hardy plants thrive in arid conditions. They exhibit a striking rosette structure, where long, pointed leaves often feature distinctive serrated edges. A personal anecdote: I remember the first time I brought an Aloe vera home; its vibrant green leaves instantly brightened up my living space and caught the eyes of every visitor!
Aloe plants are not just aesthetically pleasing; they also boast a multitude of therapeutic properties. The gel extracted from their leaves is widely recognized for its soothing qualities, especially when applied to minor burns and skin irritations.
Benefits of Growing Aloe Plants
Growing aloe plants comes with an array of benefits that extend beyond their visual appeal. Here’s a look at some of the top advantages:
- Air Purification: Aloe plants help filter toxins and improve indoor air quality by producing oxygen, contributing to a healthier living environment.
- Low Maintenance: Ideal for both novice and seasoned gardeners, these plants require minimal care. Watering infrequently is all that’s needed to keep them thriving.
- Medicinal Qualities: Aloe vera gel can be used medicinally for various skin concerns, such as hydration, sunburn relief, and even as a natural remedy for hair care.
- Versatility: They can easily be adapted to different settings, making them suitable for both indoor and outdoor gardens.
With so many benefits, it’s no wonder that aloe plants have become a favorite among plant enthusiasts and casual hobbyists alike.
Signs Your Aloe Plant Needs Repotting
Overcrowded Roots
One of the first indicators that an Aloe plant needs repotting is overcrowded roots. As aloe plants grow, they can become root-bound, meaning the roots have filled the current pot and started to circle around it. This can lead to stunted growth and poor water absorption. Personally, I once ignored this warning sign, only to discover my Aloe vera struggling to thrive in a cramped environment. The moment I repotted it, the difference was astonishing!
How can you tell if your Aloe plant is root-bound? Look for:
- Roots visibly protruding from the drainage holes
- A pot that feels heavy despite a recent watering
- The plant tipping over due to lack of stability
Stunted Growth
Another telltale sign that your Aloe plant needs repotting is stunted growth. If you’ve noticed that your Aloe has stopped growing or its new leaves are smaller than usual, it may be signaling that it is time for a larger pot. It’s disappointing when a once-healthy plant seems to halt its progress, but this can be rectified with a simple repotting!
Keep an eye out for:
- Minimal new leaf development
- Leaves becoming discolored or browning
- Overall decline in vigor
Watering Issues
Watering problems might arise if your Aloe is cramped in its pot. If you find that water isn’t draining properly, it’s likely that the roots are taking up too much space, causing pooling at the surface. I remember a time when my Aloe received overwatering, leading to soggy soil that suffocated the roots. This prompted me to address the issue through repotting.
Signs of watering issues include:
- Soil that remains damp for extended periods
- Yellowing leaves or mushy textures
- Foul odors emanating from the soil
By recognizing these signs early on, you can ensure your Aloe plant thrives and maintains that extraordinary beauty and health we all adore.
Choosing the Right Pot and Soil
Selecting the Appropriate Pot Size
When it comes to repotting an Aloe plant, selecting the right pot size is crucial for its overall health. A pot that is too large can retain excess moisture, leading to root rot, while a pot that is too small can continue to constrain the roots. Think of it as finding the perfect pair of shoes—too tight, and your plant will struggle; too loose, and it will get lost!
For a healthy Aloe, consider the following:
- Pot Size: Choose a pot that is one size larger than the current one, typically about 2 inches wider in diameter.
- Material: Opt for pots made of materials that facilitate drainage, such as terracotta or clay. These materials also help manage moisture levels, which is essential for succulent plants.
- Drainage Holes: Make sure your pot has plenty of drainage holes at the bottom to prevent water from pooling, which is a common reason for root issues.
Ideal Soil Mixture for Aloe Plants
Next up is the soil mixture! Aloe plants thrive in well-draining soil that allows their roots to breathe. During my own gardening journey, I learned the hard way that regular potting soil retains too much moisture for these succulents. Instead, you should aim for a mixture that balances nutritional content with drainage.
An ideal soil composition for Aloe plants includes:
- Cactus Mix: Pre-packaged cactus soil can be a great foundation since it’s designed for succulents.
- Perlite or Pumice: Adding perlite or pumice promotes drainage and aeration. A mix of 50% cactus soil and 50% perlite works wonders!
- Sand: Coarse sand can be blended in for additional drainage—just avoid fine sand, as it can compact and impede root growth.
By carefully selecting the right pot size and soil mixture, you set the stage for your Aloe plant to flourish beautifully, ensuring its resilience and vibrancy for years to come.
Repotting Process
Preparing the Aloe Plant
Before diving into the repotting process, it’s essential to prepare the Aloe plant for its big move. This preparation helps minimize stress on the plant and ensures a smoother transition. I always make it a habit to check the moisture level of my plant before repotting; waiting a day or two after watering can help with the process. Here’s how to get started:
- Watering: Ensure your Aloe is slightly dry before repotting, which makes the roots less fragile.
- Gather Tools: Prepare your new pot, fresh soil mix, gloves, and a small gardening trowel. Having everything ready makes the process more enjoyable and efficient!
- Inspect the Plant: Take a moment to look for any signs of pests or disease. This is a good time to check if any leaves are damaged and could be trimmed.
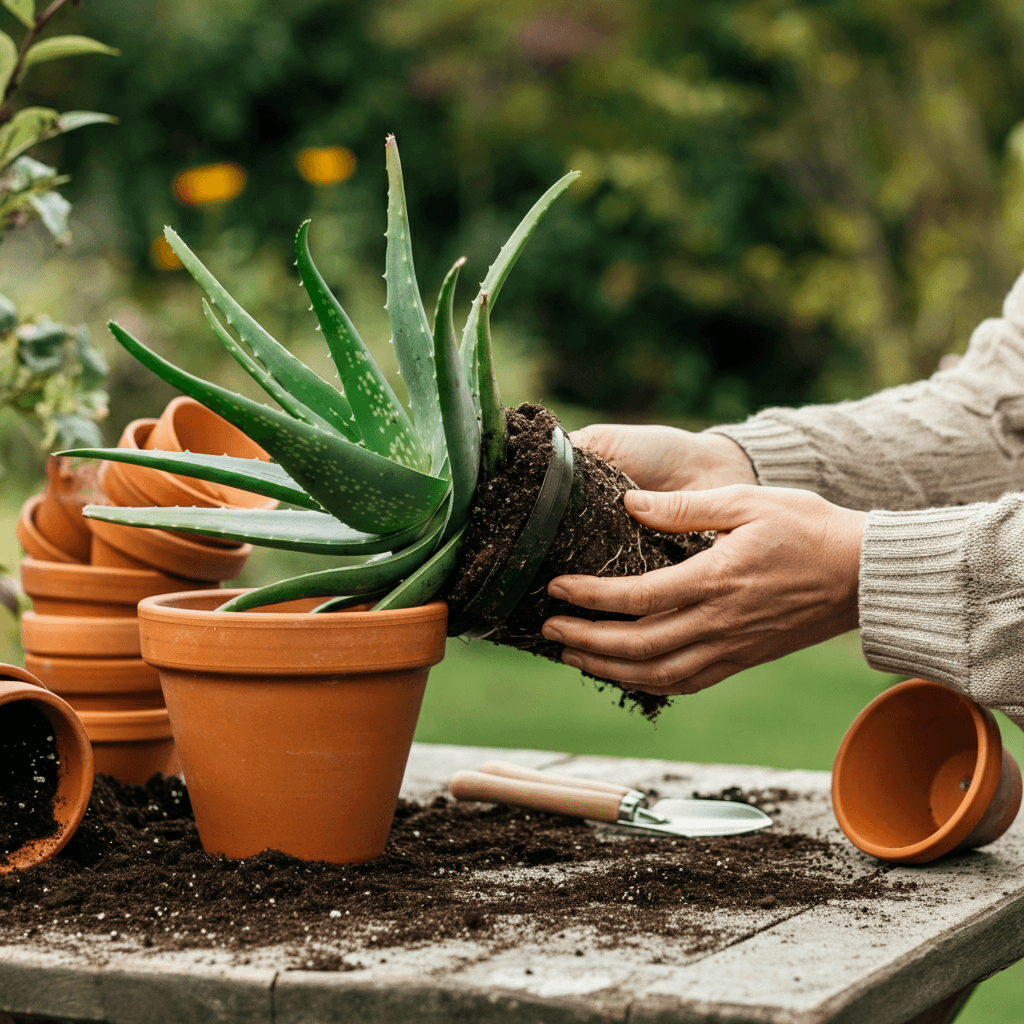
Removing the Aloe Plant from its Current Pot
Gently removing the Aloe plant from its current pot is crucial to avoid damaging its roots. The first time I did this, I was overly cautious, and it turned into a bit of a wrestling match! Here’s a smoother approach:
- Loosen the Soil: Use your fingers or a trowel to gently loosen the soil around the edges of the pot. This helps the plant slide out without tearing the roots.
- Tip the Pot: Hold the base of the plant, tip the pot sideways, and gently coax the plant out. If it resists, you may need to wiggle it gently to free it.
Repotting the Aloe Plant in the New Pot
Now for the exciting part: repotting your Aloe in its new home! This is where your careful preparation pays off.
- Add Soil: Place a layer of your soil mixture in the bottom of the new pot. Aim for about one-third of the pot’s height.
- Position the Plant: Center the Aloe in the pot and add more soil around the edges, ensuring the root ball is even with or slightly below the pot’s rim.
- Firm it Down: Lightly press the soil to eliminate air pockets while keeping the plant secure but not too tightly packed.
After repotting, give your Aloe a good drink of water, but make sure any excess drains out. Watching your Aloe thrive in its new pot is incredibly rewarding, and with these steps, you’ll feel confident every time you move your beloved plant!
Post-Repotting Care Tips
Watering Guidelines
After successfully repotting your Aloe plant, it’s crucial to establish proper watering practices to support its recovery and growth. I learned early on that Aloe plants thrive on less water rather than more, so finding the right balance has been a journey!
Here are some effective watering guidelines to follow post-repotting:
- Wait a Week: It’s best to wait about a week before watering your newly repotted Aloe plant. This gives the roots time to adjust and heal from any trauma during repotting.
- Check Soil Moisture: Before watering, stick your finger about an inch into the soil. If it feels dry, it’s time for a drink. If it’s still moist, wait a few more days.
- Soak and Drain: When you do water, soak the soil thoroughly until water drains from the bottom, ensuring that all roots receive moisture without pooling.
Remember that Aloe plants are drought-resistant and are more prone to issues from overwatering than underwatering.
Placement and Light Requirements
Finding the right location for your repotted Aloe plant can greatly contribute to its health. Placement is key—too much direct sunlight can scorch those delicate leaves, while too little can stunt growth.
Here’s how to position your Aloe for optimal growth:
- Bright, Indirect Light: Place your Aloe in a spot where it receives bright, indirect sunlight. South or west-facing windows are often ideal.
- Rotate Occasionally: If your plant is leaning towards the light source, rotating it every couple of weeks can encourage even growth.
- Avoid Cold Drafts: Be mindful of placing your plant near drafts or sudden temperature changes. Aloe prefers temperatures between 60°F to 75°F (15°C to 24°C).
By adhering to these watering and placement guidelines, you ensure that your Aloe plant not only recovers from its recent move but also flourishes beautifully. Enjoy watching it thrive, as it will reward you with its charming presence for years to come!
Common Mistakes to Avoid
Overwatering
Overwatering is perhaps the most common mistake that many Aloe plant owners make, myself included when I first started. It’s easy to think that more water equals a healthier plant, but with Aloe, this couldn’t be further from the truth. Aloe plants are succulents, designed to thrive in arid conditions, and they store water in their leaves.
To avoid overwatering, follow these guidelines:
- Monitor Soil Moisture: Always check the soil’s moisture level before watering. I have found that using a moisture meter can be quite helpful for this.
- Stick to a Schedule: Establish a watering routine, usually every three weeks or so, depending on the environment. Adjust frequency based on season and humidity levels.
- Signs of Overwatering: Be aware of signs like yellowing leaves, a mushy texture, or root rot, which can often occur if your plant is kept in soggy soil.
Using the Wrong Soil Type
Another frequent pitfall is using the wrong soil type for Aloe plants. Regular potting soil retains too much moisture, leading to root problems and ultimately jeopardizing your plant’s health. I made this mistake during my early gardening days, and it took me a while to understand the importance of well-draining soil!
To ensure your Aloe thrives, consider these tips:
- Cactus Mix: Use a pre-mixed cactus or succulent soil that offers excellent drainage. It’s specifically formulated to cater to the needs of moisture-sensitive plants.
- DIY Soil Mix: If you want to create your own, combine potting soil with perlite and coarse sand in a 50/50 ratio. This mixture promotes airflow while retaining some moisture.
- Avoid Clay Soils: Steer clear of clay-based soils, as they can compact and suffocate the roots.
By avoiding these common mistakes, you’ll not only enhance the longevity of your Aloe plant but also enjoy its vibrant beauty without unnecessary stress. Happy gardening!
Troubleshooting Issues After Repotting
Wilting Leaves
Experiencing wilting leaves after repotting your Aloe plant can be concerning, especially when you’ve put in the effort to ensure a healthy transition. I remember looking at my Aloe with drooping leaves just days after repotting, and it made me anxious about whether I had done something wrong.
Some common causes of wilting leaves include:
- Transplant Shock: Just like people can feel disoriented after a move, your Aloe might experience transplant shock. It’s essential to give your plant some time to adjust to its new pot and soil.
- Improper Watering: Overwatering immediately after repotting can cause leaves to droop. Remember to wait about a week before watering and check the moisture level before doing so.
- Insufficient Light: If the plant is placed in a darker area post-repotting, it may show signs of stress. Ensure it’s receiving bright, indirect sunlight to encourage recovery.
If you notice wilting, don’t panic! Adjusting watering habits and providing adequate light can help perk those leaves back up in no time.
Root Rot
Root rot is one of the more severe issues that can arise after repotting. Having encountered it once, I can share it often results from overwatering, poor drainage, or using the wrong soil type.
Signs of root rot include:
- Brown or Black Roots: When you carefully unpot the plant again, look at the roots. Healthy roots are typically white or light tan. Dark, mushy roots indicate rot.
- Foul Smell: If the soil emits a sour or rotten odor, it’s a sure sign of root rot.
To address root rot:
- Remove Affected Roots: Carefully trim away any black or mushy sections. It may feel harsh, but it’s necessary for recovery.
- Repot with New Soil: Use a well-draining soil mix and a clean pot to prevent further issues. It’s a great time to check the drainage holes!
- Adjust Watering: Move forward with a more cautious watering routine to ensure the roots don’t suffer again.
By being aware of these troubleshooting steps, you can better support your Aloe plant in its ongoing health journey, ensuring it remains a thriving part of your home.
FAQs About Repotting Aloe Plants
As we conclude our guide on repotting Aloe plants, you may still have some lingering questions. Here are some frequently asked questions that I often come across, along with my personal insights and experiences.
How often should I repot my Aloe plant?
Typically, Aloe plants should be repotted every 2-3 years or when you notice signs of overcrowded roots or stunted growth. Personally, I’ve found that keeping an eye on the size of the pot in relation to the plant’s growth is key. If your Aloe looks cramped for space, it’s time for a move!
What size pot should I choose for repotting?
Ideally, the new pot should be about 2 inches wider in diameter than the current one. This size allows room for growth without overwhelming the roots. When I upgraded my Aloe to a larger pot, I was amazed at how much faster it thrived!
Can I use regular potting soil for my Aloe?
While it might be tempting to use regular potting soil, it’s generally too moisture-retentive for Aloe plants. Instead, opt for a cactus mix or create a mix of potting soil, perlite, and sand. This will promote proper drainage, which is crucial for your plant’s health.
What should I do if my Aloe plant starts wilting after repotting?
If you notice wilting leaves, don’t fret! First, check the moisture level of the soil—overwatering is a common culprit. Providing adequate light and allowing the plant time to adjust can also make a big difference.
Navigating the world of repotting may come with challenges, but it’s also an exciting opportunity to foster your Aloe plant’s growth. With these FAQs answered, you’re better equipped to ensure your succulent friend thrives beautifully in its new home!